Braids are a massive trend every summer what with it being festival season and they are great to keep hair out of the way yet still look very cute, stylish and it looks like you made a massive effort when really, it was easy peasy. Always remember, practice makes perfect!
 Vanessa Hudgens pulls off the side boho braid | 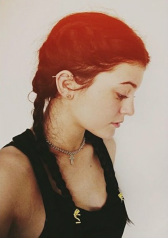 Kylie Jenners french braids are effortlessly fab |
I've created these step-by-step pictures as a way to try and break down the braiding process in as simple a method I could.
A special thank you to my cousins who helped out with being my hair models and photographers for the tutorials.
A special thank you to my cousins who helped out with being my hair models and photographers for the tutorials.
The cute boho braid.

1- Section off the front and a small portion of one side of your hair and pin the rest of the hair back out of the way.
2- Grab the start of the front section of your hair and part it into 3 sections, ensuring you don't have all the hair in this and some is still hanging below to be able to braid down the head.
2- Grab the start of the front section of your hair and part it into 3 sections, ensuring you don't have all the hair in this and some is still hanging below to be able to braid down the head.

3- Once you have your 3 sections of hair which are of equal size, grab strand 1(S1) and underlap it over strand 2(S2) so strand 2 is now in strand 1 place.
4- Grab strand 3 (S3) and then place that under S1, as seen above in the picture, so the formation should be S2, S3 and then S1.
4- Grab strand 3 (S3) and then place that under S1, as seen above in the picture, so the formation should be S2, S3 and then S1.

5- Carry on the same process as from picture 3, except this time bring in small sections from each side when you are plaiting the strands.
6- This will then secure the braid to your head as when you add extra pieces in, its holding the braid down on the head.
6- This will then secure the braid to your head as when you add extra pieces in, its holding the braid down on the head.

7- Carry this on down the head until you start to curve it slightly when you get to the top of the head. As you can see adding the smaller pieces from the side will hold the braid in the shape you desire.
8- Once you reach around the top or half way down the ear you can then simply braid the hair down as before, except this time you don't add in any pieces of hair so the braid can fall itself. Then secure with a clear elastic or whatever hair accessory you wish and that's it done!
8- Once you reach around the top or half way down the ear you can then simply braid the hair down as before, except this time you don't add in any pieces of hair so the braid can fall itself. Then secure with a clear elastic or whatever hair accessory you wish and that's it done!
Kylie Jenner inspired

1- Section the hair down the middle of the head or wherever you prefer as long as the parting is straight from the front to the back of the head.
2- Once you have the hair parted you then want to section and tie off one half of the hair to ensure that no hair is carried over either side and the parting is kept clean.
2- Once you have the hair parted you then want to section and tie off one half of the hair to ensure that no hair is carried over either side and the parting is kept clean.

3- Section off part of the hair near the front into 3 sections of equal width.
4- Its the same sort of idea as the previous braid, this time you are lapping the pieces of hair over each other. Grab S1 and place it over S2 as seen above.
4- Its the same sort of idea as the previous braid, this time you are lapping the pieces of hair over each other. Grab S1 and place it over S2 as seen above.

5- Then grab S3 and lap it over S1 so the formation should be similar to as above.
6- You then repeat these steps but you add in pieces of hair from each side into the section of hair you are braiding with. Try keeping the pieces of hair the same size that you are adding in.
6- You then repeat these steps but you add in pieces of hair from each side into the section of hair you are braiding with. Try keeping the pieces of hair the same size that you are adding in.

7- Carry on using the same process as before until you have all of the pieces of hair added into the braid which is usually the base of the head or top of the neck.
8- From here you simply braid the rest of the hair down as far as you want and secure it at the bottom with a hair tie. You then move over to the other section of hair which is tied off and follow the exact same steps.
8- From here you simply braid the rest of the hair down as far as you want and secure it at the bottom with a hair tie. You then move over to the other section of hair which is tied off and follow the exact same steps.
Extra ideas

Follow the Kylie Jenner inspired braids except once you have the top 3rd of the hair braided to the head, continue braiding the remainder hair out loose so its not attached to the head. Then you grab the remainder of the hair, twist it into a space bun and wrap the plait around the inside to create this cute and quirky hairstyle.

By using bows or other cute hair accessories you can transform the look of your hair and it gives it an elegant and girly look!


After practicing and experimenting with different braids or differnet methods you can create anything you want. Above are 2 different styles of hairstyles with braids incorporated. The 1st one is the boho braid except I didn't stop at the ear and I carried it on the whole way around her head giving this trendy, snake look which is absolutely love! The 2nd hairstyle was done for my best friends formal she was attending by braiding to small sections near the front of her head, creating a donut bun low on the back of her head and the crossing and wrapping the remainder of the braids around the bun, she and I were both very pleased with how it turned out!
Hope you guys enjoyed this post and it hopefully helped somebody!
If you recreate any of the looks, take a picture and tag me on Instagram or twitter so I can see it, I would love it!
Tori x
Hope you guys enjoyed this post and it hopefully helped somebody!
If you recreate any of the looks, take a picture and tag me on Instagram or twitter so I can see it, I would love it!
Tori x
 RSS Feed
